Google Search Page

Google

Friday, February 15, 2008

components of Laptops

Common laptop features:
1. Small and portable
2. Integrated display screen in lid
3. Integrated keyboard
4.AC power source or rechargeable battery
5.Hot-swappable drives and peripherals
6. Some type of docking station or port replicator to connect to peripherals

Front view of laptop :


Right side view of laptop


Rear view of laptop


Open laptop


Rear view of docking station :

Thursday, February 14, 2008

LAPTOPS

Introduction :
1. when the first laptops were developed?
2. Who do you think used the early laptops?
3. One of the original laptops was the GRiD Compass 1101. It was used by astronauts on space missions in the early 1980s.
4. It weighed 11 lb (5 kg) and cost US $8,000 - $10,000!
5. This chapter focuses on the differences between laptops and desktops and describes the features of PDAs and Smartphones.

Laptops and Portable Devices :
1. Notebooks, laptops, and tablets are types of portable computers.
2. Today, laptops are very popular because advances in technology have resulted in laptops that cost less, weigh less, and have improved capabilities.
3. PDAs offer features such as games, web surfing, e-mail, instant messaging, and many other features offered by PCs.
4. Smartphones are cell phones with many built-in PDA capabilities.

Common Uses of Laptops :
1. Taking notes in school or researching papers .
2. Presenting information in business meetings.
3. Accessing data away from home or the office
4. Playing games while traveling
5. Watching movies while traveling
6. Accessing the Internet in a public place
7. Sending and receiving email in a public place

Wednesday, February 13, 2008

OPERATING SYSTEM Cont..

Role of an Operating Systems :

  • All computers rely on an operating system (OS) to provide the interface for interaction between users, applications, and hardware.
  • The operating system boots the computer and manages the file system.
  • Almost all modern operating systems can support more than one user, task, or CPU.
  • The operating system has four main roles:

Control hardware access
Manage files and folders
Provide user interface
Manage applications

Characteristics of Operating Systems

  • Control hardware access
    OS automatically discovers and configures PnP hardware
  • File and folder management
  • User interface
    Command line interface (CLI)
    Graphical user interface (GUI)
  • Application management
    Open Graphics Library (OpenGL)
    DirectX

The Types of Operating Systems
1. Command Line Interface (CLI): The user types commands at a prompt.
Ex. DOS
2. Graphical User Interface (GUI): The user interacts with menus and icons.
Ex. Windows 2000, Windows XP etc.,

Compare Operating Systems:

Terms often used when comparing operating systems:

  • Multi-user – Two or more users can work with programs and share peripheral devices, such as printers, at the same time.
  • Multi-tasking – The computer is capable of operating multiple applications at the same time.
  • Multi-processing – The computer can have two or more central processing units (CPUs) that programs share.
  • Multi-threading – A program can be broken into smaller parts that can be loaded as needed by the operating system. Multi-threading allows individual programs to be multi-tasked.

Real Mode

  • Executes only one program at a time
  • Addresses only 1 MB of system memory at a time
  • Directly accesses memory and hardware
  • Subject to crashes
  • Available to all modern processors
  • Only used by DOS and DOS applications

Protected Mode

  • Has access to all memory
  • Can manage multiple programs simultaneously
  • Allows the system to use virtual memory
  • Provides 32-bit access to memory, drivers, and I/O transfers
  • Each program is assigned a space in memory
  • Computer is protected from program errors

Virtual Real Mode

  • Allows a real-mode application to run within a protected-mode operating system
  • Creates virtual machines for each program that runs in real mode
  • Each virtual machine receives 1 MB of memory and access to hardware
  • In the event of a program error, only the virtual machine is affected

Compare Operating Systems
Desktop operating systems:
Microsoft Windows: Windows XP
Macintosh: Mac OS X
Linux: Fedora, Ubuntu, and others
UNIX
A desktop OS has the following characteristics:
Supports a single user
Runs single-user applications
Shares files and folders on a small network with limited security

Network Operating Systems (NOS)

Common NOS include:
Novell Netware
Microsoft Windows Server
Linux
UNIX
A network OS has the following characteristics:
Supports multiple users
Runs multi-user applications
Is robust and redundant
Provides increased security compared to desktop operating systems

Tuesday, February 12, 2008

Operating System

What is an Operating System ?
An operating system is a program designed to run other programs on a computer. A computer’s operating system is its most important program. It is considered the backbone of a computer, managing both software and hardware resources. Operating systems are responsible for everything from the control and allocation of memory to recognizing input from external devices and transmitting output to computer displays. They also manage files on computer hard drives and control peripherals, like printers and scanners.
There are multiuser, multiprocessing, multitasking, multithreading, and real-time operating systems.
A multiuser operating system enables multiple users to run programs simultaneously. This type of operating system may be used for just a few people or hundreds of them. In fact, there are some operating systems that are used to allow thousands of people to run programs at the same time.
A multiprocessing operating system allows a program to run on more than one central processing unit (CPU) at a time. This can come in very handy in some work environments, at schools, and even for some home-computing situations.
Multitasking operating systems work a little differently; they make it possible to run more than one program at a time. Multithreading operating systems are even more different, allowing varied parts of one program to be used simultaneously.
Real-time operating systems are designed to allow computers to process and respond to input instantly. Usually, general-purpose operating systems, such as disk operating system (DOS), are not considered real time, as they may require seconds or minutes to respond to input. Real-time operating systems are typically used when computers must react to the consistent input of information without delay. For example, real-time operating systems may be used in navigation.
Today’s operating systems tend to have graphical user interfaces (GUIs) that employ pointing devices for input. A mouse is an example of such a pointing device, as is a stylus. Commonly used operating systems for IBM-compatible personal computers include Microsoft Windows, Linux, and Unix variations. For Macintosh computers, Mac OS X, Linux, BSD, and some Windows variants are commonly used.

Windows 2000 Professional Installation - part-III


I. Ask Regional Settings. You have select the Regional Settings according to the your country.


II. Now input your Product Key, this is 25 characters long and can be found in the Windows 2000 packaging or on the side or back of your machine. Click next to continue. If you get any errors then double check what you have inputted and make sure you have used the correct letters and numbers.


III. If your computer is on a network than click on "YES...." and input the workgroup name, otherwise leave at "NO..." and click "NEXT"


IV. More components will now install


V. and finally click on "FINISH" to complete the Windows 2000 install.


VI. After Press the Finish Button, now remove the 2000 professional CD from CD-ROM drive and restart the system. The Windows 2000 professional Login Screen is appear on the monitor.


VII. You have to given the administrator password as set in the installation time. After giving correct password, windows desktop is appearing. After that you have to use the operating system.

Windows 2000 Professional Installation - part-II

I. After Restart the computer, the 2000 professional CD is in CD-Rom drive, so it ask "Press any key to boot from CD". Now you don't press any key in key board. after few seconds the windows install will start again


II. Be patient , windows is loading


III. Now the setup wizard. (Mouse is now active) Press "NEXT" to continue.....


IV. Now you get to wait again, be patient the "Installing Devices" part of the install can take forever

Windows 2000 Professional Installation - part-I

Welcome to windows 2000 Professional Installation
This guide is step by step and fully graphical representation.
Required :
1. A Windows 2000 Professional CD
2. A Computer with CD-ROM access
To start the install, first check that the first boot device in your system BIOS is set to the CD-ROM Drive.
( To find out how to access the BIOS please refer to your motherboard manual or the manufacturer of your Laptop. (The system bios can usually be entered on boot, usually by pressing the F1, F2, F8, F10 or DEL key. Make sure you save the settings before exiting))

If you are unsure or don't want to enter the BIOS then just test the computer by putting the CD-ROM in the drive and reboot your computer. This is the recommended way to install windows.


I. insert the Windows 2000 Professional CD and reboot your computer. The first menu will show it will say "Press any key to boot from CD...." at this point press the space bar on the computer


II. Windows will start the installation. This may take some time as Windows copies file in preparation to installation.


III. press "ENTER" to start the Install.


IV. Now the user Agreement, read and Press "F8" to continue, if you disagree press "ESC", setup will then exit.


V. Now select the Windows 2000 installation and press "Enter" to Fresh Installation

VI. Select the Installation Drive to install windows 2000.

VII. If Not Formatted, then Format the Drive use of NTFS or FAT. If you format the drive with NTFS only you have to set the security of the drive.

VIII. After Formatting and Click to install , Setup will now examine the Drives....


IX. Setup is copied the files to Installation Folder


X. Now setup will initialise the Windows 2000 configuration.


XI. setup will be required to reboot, make sure you have to floppies in the drives, and press "ENTER" to speed things up.


Windows XP Command Line Commands

The most commonest Command line commands are listed given below :
These commands are run in windows by clicking "START", "RUN" and then by typing the command in the box and clicking "OK"

1. Services.msc ‐ Services Utility
2. Comexp.msc ‐ Component Services
3. Secpol.msc ‐ Local Security Policy
4. Compmgmt.msc ‐ Computer Management
5. Calc ‐ Calculator
6. Dfrg.msc ‐ Disk Defragmenter
7. Pbrush ‐ Paint
8. Wordpad ‐ Wordpad
9. Control ‐ Control Panel
10. Devmgmt.msc ‐ Device Manager
11. Main.cpl ‐ Mouse Properties
12. Inetcpl.cpl ‐ Internet Properties
13. Gpedit.msc ‐ Group Policy Editor
14. Eventvwr.msc ‐ Event Viewer
15. Perfmon.msc ‐ Performance Monitor
16. Cmd ‐ Command Prompt
17. Cleanmgr.exe ‐ Disk Cleanup Utility
18. Notepad ‐ Notepad
19. Wmplayer ‐ Windows Media Player
20. Wupdmgr ‐ Windows Update
21. Sysdm.cpl ‐ System Properties
22. Desk.cpl ‐ Display Properties
23. Timedate.cpl ‐ Clock Properties
24. Mmsys.cpl ‐ Sounds & Audio Devices

Monday, February 11, 2008

0rkut blocking Worm Removal tool /Fix


It was fun with a windows worm named Heap41a / win32.USBworm. I hadn’t been to M$ Windows for a couple of months. When I was surfing through web, I happended to hear about an interesting worm that affects orkut.com, Mozilla fireox and youtube.com . I responded to this piece of news as oh..poor handicapped M$ windows !.
After two or three days one of my friends, Sidharth rang me and told that he was affected by a virus. He explained its features. It blocks orkut.com, youtube.com and mozilla fireox. It gives the message :
“Orkut IS BANNED, orkut is banned you fool The administrators didnt write this program guess who did?? r r MUHAHAHA!! “
Even though I’m a M$ Windows hater, I thought of fixing it for him since I’m always interested in this sort of hacking. I went through the web and learned about the worm.
It spreads through USB pendrives and removable storage devices. I found that there wasn’t any free fixing tool avaliable for remove the worm. There were some manual removal instructions.
Lets see what this worm does
It runs a exe file which is name MicrosoftPowerpoint.exe which is located in the USB disk. The autorun.inf runs this file when double clicked. Once this program is run you are infected. It hides all your hidden folders, runs the process in the memory, makes the worm to start with windows and pops those annoying messages. This worm doesn’t destroy any system files. It just infects other USB drives and spreads to new hosts.
Non-avaliability of a free removal tool urged me to write one of my own.
Before I write a fix I wanted to make my machine infected of the worm. and hence i was in need for the worm. I instructed sidharth to make zipped copy of the worm and he mailed to me. Cheers !
Here is the fix for Orkut, Youtube, Fireox Blocker (Heap41a / win32.USBWorm)
This tool can be used to remove the Blocker worm as well as prevent the Worm further to get infected on the same machine.
Click here to download.
Usage Instructions:
1) Download the fix and run on infected machine.2) It will ask for a re login.3) After logging again run the fix again. The worm will be removed succesully.4) Log to www.sarathlakshman.info and comment here
UPDATE: Here is an update howto remove worm from pen drive.1. Remove the file autorun.inf2. Re-insert the pendrive.3. Format it
There is only a permanent method to avoid all sort of worms / viruses. -> Use Gnu/Linux operating system and rock your desktop !

Remote Shutdown Tool to Shut Down and Restart a Computer in Windows 2000

Description of Shutdown.exe tool :
Shutdown.exe uses the following syntax:
shutdown \\computername /l /a /r /t:xx "msg" /y /c You can use the following switches with Shutdown.exe:
• \\computername: Use this switch to specify the remote computer to shut down. If you omit this parameter, the local computer name is used.
• /l (Note that this is a lowercase "L" character): Use this switch to shut down the local computer
• /a: Use this switch to quit a shutdown operation. You can do this only during the time-out period. If you use this switch, all other parameters are ignored.
• /r: Use this switch to restart the computer instead of fully shutting it down.
• /t:xx: Use this switch to specify the time (in seconds) after which the computer is shut down. The default is 20 seconds.
• "msg": Use this switch to specify a message during the shutdown process. The maximum number of characters that the message can contain is 127.
• /y: Use this switch to force a "yes" answer to all queries from the computer.
• /c: Use this switch quit all running programs. If you use this switch, Windows forces all programs that are running to quit. The option to save any data that may have changed is ignored. This can result in data loss in any programs for which data is not previously saved.

Examples

• To shut down the local computer in two minutes and display a "The computer is shutting down" message, use the following line in a batch file or type it at a command prompt, and then press ENTER:
shutdown /l /t:120 "The computer is shutting down" /y /c
To cancel the shutdown process, type the following line at the command prompt, and then press ENTER:
shutdown /l /a /y

• To shut down and restart a remote computer named "Support," use the following line in a batch file or type it at a command prompt, and then press ENTER:
shutdown \\support /r

• To schedule the local computer to shutdown and restart at 10:00 P.M., type the following line at a command prompt, and then press ENTER:
at 22:00 shutdown /l /r /y /c

• To schedule the local computer to shutdown and restart at 6:00 P.M. every weekday, type the following line at a command prompt, and then press ENTER:
at 18:00 /every:M,T,W,Th,F shutdown /l /r /y /c

Missing shutdown button - Windows

Click Start, Run.

Type gpedit.msc and click OK.

Navigate to the following path:User Configuration\Administrative Templates\Start Menu and

Taskbar Double-click "Remove and Prevent Access to the Shut Down command"

Select "Not configured" or "Disabled"

Close Group Policy window.

How Do Rectify A Missing Or Corrupt Ntoskrnl Error

Another error message that you may occasionally get is a missing or corrupt ntoskrnl. Like most of these type of problems it is usually a simple case of copy an new copy from your XP CD to your hard drive.
1/ Place your Windows XP CD into your CD-ROM and Reboot your PC
2/ XP's setup program will automatically start and files will be loaded to memory
3/When you reach the Welcome to Setup screen choose the Repair option by pressing R
4/ This will open the Recovery Console
4/ The list of Windows installations will appear
5/ As you only have one installation on your PC you need to press the number which is relevant to your installations location. This, obviously will typically be 1
6/ You now need to enter your Administrator password to gain access. If you are using Windows XP Home edition the administrator password is blank by default so simply press Enter
7/ At the command prompt change to the drive letter that contains your CD
8/ Next type: cd i386
9/ The directory should now change to the i386 directory
10/At the command prompt you now need to type: expand ntkrnlmp.ex_C:\Windows\System32\ntoskrnl.exe
11/The relevant file should now be expanded and copies to the windows\system32 directory of your C:\ drive
12/ Finally, remove the Windows XP cd from your CD-ROM and, at the command prompt type: Exit

How Do Convert My FAT32 File System To NTFS

Windows XP supports two types of files system, FAT32 and NTFS. Of the two, the NTFS is by far the more secure. Unfortunately, your operating system may have been installed using the FAT32 files system and now, after some considerable thought, you may decide that you really want an NTFS file system. This doesn't present a problem to Windows XP although you should be aware of a few important points.

On Converting you may loose files. You are warned about this when you begin the conversion. Another point is, do not covert if you have a multi-boot system containing Windows 98, 98 or Me. If you do have these operating systems and you decide to convert you will be unable to start the previous versions of Windows. If you need to multi boot with these operating systems and you still want an NTFS file system you would be advised to completely reinstall Windows XP and, at the format stage, select that the partition be formatted in NTFS.

1/ Click the Start Button
2/ Next click All programs, followed by Accessories
3/ In the Accessories drop down menu select Command Prompt
4/ At the Command Prompt type: Vol C:
5/ You should now see the following information:
Volume in drive C: is XP Home (or whichever version of XP you have)
Volume Serial Number is FF47-80EB (obviously yours will not be the same, but you get the general idea)
7/ Make a note of the Volume in drive details and the Volume serial number.
8/At the Command Prompt type: convert c: /fs:ntfs (Replace the c: with whatever drive letter you are converting)
9/ Press Enter
10/ When asked for the Volume Label for drive C: type XP Home (or XP Pro depending upon your current operating system)
11/ Press Enter
12/ Because you are converting the C: drive (this contains the operating system), a message will appear informing you that the drive cannot be converted. You will then be given the option of scheduling a conversion the next time you boot your machine.
13/ Schedule the conversion and reboot
14/ After rebooting the conversion should proceed as normal.

How Do Rectify A Missing Or Corrupt NTFS.SYS Error

Windows XP can be formatted in two different file systems, FAT32 and NTFS. If you are running a machine with a FAT32 files system and then decide to convert to NTFS using the converts option - see How do I convert my FAT32 file system to NTFS - on rebooting you may get a missing or corrupt ntfs.sys error. Here is how to rectify this problem

1/ Insert the Windows XP CD into your CD-ROM and reboot your pc
2/ Allow the basic setup files to load into memory
3/At the Welcome to Setup screen press R
4/ This will start the Recovery console and the list of Windows installations will appear
5/ As you only have one installation on your PC you need to press the number which is relevant to your installations location. This, obviously will typically be 1
6/ You will need to enter your Administrator password. If you are using Windows XP Home edition the administrator password is blank by default so simply press Enter
7/ At the Recovery Console command prompt type: cd \windows\system32\drivers
8/ Next press Enter
9/ The windows system 32 drivers directory will now open
10/ Now type: ren ntfs.sys ntfs.old
11/ Again press Enter
12/ If a message appears telling you that the Ntfs.sys file was not found, then the file is actually missing rather than corrupt
13/ The above command will change the name of your corrupt file from Ntfs.sys to Ntfs.old
14/Now type the following at the command prompt substituting the X (after copy) with the drive letter of your CD and the X (after drive) with the drive letter of your hard drive. The hard drive usually being the C:/ drive
15/ copy X:\i386\ntfs.sys drive X:\windows\system32\drivers
16/ Remove the Windows XP CD from your CD-ROM
17/ Now in the command prompt type: Exit
18/ Restart your PC to make sure the problem has been rectified

How Do I Repair A Missing Or Corrupt Windows\System32\Conf\System File

This type of error usually indicated that the pc has refused to start because of a corruption within the registry. The following should remedy the problem. However, it is important that you replace all five registry hives. Simply replacing one or two could, potentially, cause other problems.
NOTE
You should not use the method two set of instructions below if your system has an OEM (Original Equipment Manufacturer) copy of Windows XP. Doing so will render your operating system inoperable. OEM installations create passwords and user name that did not previously exist. Therefore, in your own interest, these instructions will not remedy the problem. The easiest option with OEM copies of XP is to reinstall XP using the manufacturer’s recovery disks.
Easy Method
1/ Restart your PC
2/ Keep tapping the F8 Button until a menu appears
3/ When the menu appears use the UP and DOWN arrow keys to select the ‘Last known good configuration’ option.
4/ Once selected press Enter
5/ Your PC should now reinstall the ‘last known good configuration file’
6/ Restart your PC and see if the problem has been solved
7/ If it hasn’t go on to the Harder Method below.

Harder Method

Step One
1/ Insert the Windows XP CD into the CD-ROM and restart your pc
2/ At the ‘Welcome to Setup’ screen press R to start the recovery Console
3/ The Recovery Console will now open and the list of Windows installations will appear
4/ As you only have one installation on your PC you need to press the number which is relevant to your installations location. This, obviously will typically be
5/ When requested type in your Administrator password. If you haven’t set an administrator password, then simply press Enter
6/ The Recovery Console command prompt window will now appear
7/ At the Command prompt type the following, pressing Enter after you have typed each line.
md tmpcopy c:\windows\system32\config\system c:\windows\tmp\system.bakcopy c:\windows\system32\config\software c:\windows\tmp\software.bakcopy c:\windows\system32\config\sam c:\windows\tmp\sam.bakcopy c:\windows\system32\config\security c:\windows\tmp\security.bakcopy c:\windows\system32\config\default c:\windows\tmp\default.bakdelete c:\windows\system32\config\systemdelete c:\windows\system32\config\softwaredelete c:\windows\system32\config\samdelete c:\windows\system32\config\securitydelete c:\windows\system32\config\defaultcopy c:\windows\repair\system c:\windows\system32\config\systemcopy c:\windows\repair\software c:\windows\system32\config\softwarecopy c:\windows\repair\sam c:\windows\system32\config\samcopy c:\windows\repair\security c:\windows\system32\config\securitycopy c:\windows\repair\default c:\windows\system32\config\default
8/ Now type Exit to exit the recovery console
9/ Finally restart your pc

Step Two
10/ When the PC restarts log on as Administrator. if you are using Windows XP Home you can only log on as Administrator via Safe Mode.
11/ The next step is to copy the registry files from their backed up location using system restore. However, before you can begin you need to set the folder options in Windows Explorer to Show Hidden Files and Folders
12/ Open Windows Explorer
13/ Click the Tools option on the main toolbar
14/ From the drop down menu click on Folder options
15/ In the Folder options window click the View tab
16/ Look down the file list until you come to a section marked Hidden Files and Folders
17/ Click on the Radio button on the left of the option Show hidden Files and Folders to enable this option
18/ Next move down two lines and remove the check mark next to the option Hide Protected operating system files (Recommended)
19/ You will receive a message informing you that editing or deleting these files could cause damage to your system. Click Yes to confirm that you want to display these files.
20/ From the folder/directory list in Windows explorer click on the drive where you installed Windows XP
21/ Open the System Volume Information folder (The folder appears dimmed) If you receive a System volume Information is not accessible. access denied Error message see Microsoft Knowledgebase Article 309531
22/ Inside you will find one or more folders that look something like this "_restore{87BD3667-3246-476B-923F-F86E30B3E7F8}".
23/ If the folders are displayed as icons or thumbnails click the View option on the main toolbar and click on Details to give a more detailed view of the files
24/ Select a file that was not created at the current time and that starts with RPx (these are Restore Points)
25/ Open one of these folders and look for a Snapshot folder - for example: C:\System Volume Information\_restore{D86480E3-73EF-47BC-A0EB-A81BE6EE3ED8}\RP1\Snapshot
26/ From this snapshot folder copy the following files to C:\Windows\tmp folder
_REGISTRY_USER_.DEFAULT
_REGISTRY_MACHINE_SECURITY
_REGISTRY_MACHINE_SOFTWARE
_REGISTRY_MACHINE_SYSTEM
_REGISTRY_MACHINE_SAM
27/ Now rename the files as follows:
Rename _REGISTRY_USER_.DEFAULT to DEFAULT
Rename _REGISTRY_MACHINE_SECURITY to SECURITY
Rename _REGISTRY_MACHINE_SOFTWARE to SOFTWARE
Rename _REGISTRY_MACHINE_SYSTEM to SYSTEM
Rename _REGISTRY_MACHINE_SAM to SAM

Step Three
28/ You now have to delete the existing registry files and copy the system restore registry files to the C:\Windows\System32\Config folder: You can do this either by using Recovery Console or (if you file system is FAT32) by using a Windows 98 Start Up Disk) Whichever method you use you will be presented with a command prompt. At the command prompt type the following, remembering to press Enter after you have typed each line.
del c:\windows\system32\config\sam del c:\windows\system32\config\security del c:\windows\system32\config\software del c:\windows\system32\config\default del c:\windows\system32\config\system
29/ Now type the following, pressing Enter after you have typed each line:
copy c:\windows\tmp\software c:\windows\system32\config\software copy c:\windows\tmp\system c:\windows\system32\config\system copy c:\windows\tmp\sam c:\windows\system32\config\sam copy c:\windows\tmp\security c:\windows\system32\config\security copy c:\windows\tmp\default c:\windows\system32\config\default
30/ Finally Exit Recovery Console and Restart your PC (If you are using the Windows 98 startup disk simply press CTRL-ALT-DEL to restart your pc

Step Four
31/ After your PC has rebooted click the Start button followed by All Programs
32/ From the All Programs menu click Accessories
33/ From the Accessories drop down menu click on System Restore
34/ From the System Restore window click on the Restore to a Previous Restore Point option and restore your pc to a previous restore point

Windows XP and Vista Service Packs

Windows patches, service packs and updates for Windows XP, Windows Vista are download from below site


www.softwarepatch.com/windows/index.html

Saturday, February 9, 2008

WINDOWS XP SERVICE PACK 3 AVAILABLE FOR DOWNLOAD

Windows XP Service Pack 3 Preview actually contains security updates and hotfixes issued by Microsoft Corp. up to April 2nd, 2006; 248 files in total Each hotfix needs to be installed manually. when downloading, you may also get additional applications bundled with the software's installer file.

Download Microsoft Windows XP Service Pack 3 SP3 Build 3264 RC1 ...Download Microsoft Windows XP Service Pack 3 SP3 Build 3264 RC1 - Latest service pack for Windows XP.
www.soft32.com/download_123572.html

WINDOWS XP SERVICE PACK 2 AVAILABLE FOR DOWNLOAD

Anybody want Windows XP Service Pack 2 for the upgrade of windows XP. The Windows XP Service Pack 2 (XP SP2) fixes a range of bugs in Windows XP. The file is a large download and can be applied to any version of Windows XP Home, Professional, TabletPC or Media Center.

Download Windows XP Service Pack 2: XP SP2 (Full package)Download Windows XP Service Pack 2: XP SP2 (Full package)

www.softwarepatch.com/windows/xpsp2.html

WINDOWS VISTA SERVICE PACK 1

The Windows Vista Service Pack 1 Release Candidate (RC) is now available to the public. In addition to previously released updates, SP1 contains changes focused on addressing ...

NETWORK TECHNOLOGIES

Network Technologies :
There is no generally accepted taxonomy into which all computer networks fit, but two dimensions stand out as important: Transmission Technology and Scale. The classifications based on these two basic approaches are considered in this section.
Classification Based on Transmission Technology

Computer networks can be broadly categorized into two types based on transmission technologies:
• Broadcast networks
• Point-to-point networks

Broadcast Networks
Broadcast network have a single communication channel that is shared by all the machines on the network as shown in Figs. All the machines on the network receive short messages, called packets in certain contexts, sent by any machine. An address field within the packet specifies the intended recipient. Upon receiving a packet, machine checks the address field. If packet is intended for itself, it processes the packet; if packet is not intended for itself it is simply ignored.
This system generally also allows possibility of addressing the packet to all destinations (all nodes on the network). When such a packet is transmitted and received by all the machines on the network. This mode of operation is known as Broadcast Mode. Some Broadcast systems also supports transmission to a sub-set of machines, something knownas Multicasting.
Point-to-Point Networks
A network based on point-to-point communication is shown in Fig. The end devices that wish to communicate are called stations. The switching devices are called nodes. Some Nodes connect to other nodes and some to attached stations. It uses FDM or TDM for node-to-node communication. There may exist multiple paths between a source-destination pair for better network reliability. The switching nodes are not concerned with the contents of data. Their urpose is to provide a switching facility thatwill move data from node to node until they reach the destination.

Classification based on Scale
Alternative criteria for classifying networks are their scale. They are divided into Local Area (LAN), Metropolitan Area Network (MAN) and Wide Area Networks (WAN).
Local Area Network (LAN)
LAN is usually privately owned and links the devices in a single office, building or campus of up to few kilometers in size. These are used to share resources (may be hardware or software resources) and to exchange information. LANs are distinguished from other kinds of networks by three categories: their size, transmission technology and topology. LANs are restricted in size, which means that their worst-case transmission time is bounded and known in advance. Hence this is more reliable as compared to MAN and WAN. Knowing this bound makes it possible to use certain kinds of design that would not otherwise be possible. It also simplifies network management.
LAN typically used transmission technology consisting of single cable to which all machines are connected. Traditional LANs run at speeds of 10 to 100 Mbps (but now much higher speeds can be achieved). The most common LAN topologies are bus, ring and star. A typical LAN is shown in Fig.

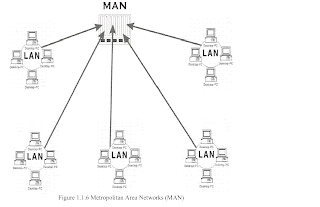
Metropolitan Area Networks (MAN)
MAN is designed to extend over the entire city. It may be a single network as a cable TV network or it may be means of connecting a number of LANs into a larger network so that resources may be shared as shown in Fig. For example, a company can use a MAN to connect the LANs in all its offices in a city. MAN is wholly owned and operated by a private company or may be a service provided by a public company.


Wide Area Network (WAN)
WAN provides long-distance transmission of data, voice, image and information over large graphical areas that may comprise a country, continent or even the whole world. In contrast to LANs, WANs may utilize public, leased or private communication devices, usually in combinations, and can therefore span an unlimited number of miles as shown in Fig. WAN that is wholly owned and used by a single company is often referred to as enterprise network.


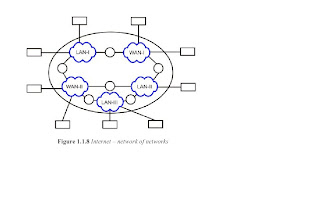
The Internet
Internet is a collection of networks or network of networks. Various networks such as LAN and WAN connected through suitable hardware and software to work in a seamless manner. schematic diagram of the Internet is shown in Fig. It allows various applications such as e-mail, file transfer, remote log-in, World Wide Web, Multimedia, etc run across the internet. The basic difference between WAN and Internet is that WAN is owned by a single organization while internet is not so. But with the time the line between WAN and Internet is shrinking, and these terms are sometimes usedinterchangeably.

Thursday, February 7, 2008

Cabling Summary

After examining the major bounded media, let's take a quick look at how they compare

Twisted Pair Cable :
Advantages
1. Inexpensive
2. Often available in existing system
3. Well tested and easy to get

Disadvantages
1. Susceptible to RFI and EMI
2. Not as durable as coax
3. Doesn’t support as high a speed as other media.

Coaxial Cable :
Advantages
1. Fairly resistant to RFI and EMI
2. Supports faster data rates than twisted pair
3. More durable than TP

Disadvantages
1. Can be effected by strong interference
2. More costly than TP
3. Bulkier and more rigid than TP

Fiber Optic Cable :
Advantages
1. Highly secure
2. Not affected by RFI and EMI
3. Highest bandwidth available
4. Very durable

Disadvantages
1. Extremely costly in product and service
2. Highest bandwidth
3. Sophisticated tool and method for installation
4. Complex to layout and settings

Tuesday, February 5, 2008

Networking Hardware .. Cont.

Twisted Pair Cable :
Twistd pair cable has been around a lot longer than coaxial, but it has been carrying voice, not data. Unshielded twisted-pair is used extensively in the nationwide telephone system. practically every home that has telepones is wired with twisted-pair cable.
Twisted-pair offers some significant benefis. It's lighter, thinner, more flexible, and easier to install than coax or fiber-optic cable. It is also inexpensive. It is therefore ideal in offices or work groups that are free of severe electromagnetic interference.
There are a various types of twisted-pair cable types, Unshielded and shielded are the two most important.

Shielded Twisted Pair cable :


Shielded twisted-pair is more immune to interference, which usually translates into higher transmission speeds over longer distance - it is more expensive.

Unshielded Twisted Pair
"unshielded twisted pair" (UTP) cabling is twisted pair cabling that contains no shielding. For networking applications, the term UTP generally refers to the 100 ohm, Category 3, 4, & 5 cables specified in the TIA/EIA 568-A standard. Category 5e, 6, & 7 standards have also been proposed to support higher speed transmission. UTP cabling most commonly includes 4 pairs of wires enclosed in a common sheath. 10Base-T, 100Base-TX, and 100Base-T2 use only 2 of the twisted pairs, while 100Base-T4 and 1000Base-T require all 4 twisted pairs.

The following is a summary of the UTP cable Categories:
Category 1 & Category 2 - Not suitable for use with Ethernet.
Category 3 - Unshielded twisted pair with 100 ohm impedance and electrical characteristics supporting transmission at frequencies up to 16 MHz. Defined by the TIA/EIA 568-A specification. May be used with 10Base-T, 100Base-T4, and 100Base-T2.
Category 4 - Unshielded twisted pair with 100 ohm impedance and electrical characteristics supporting transmission at frequencies up to 20 MHz. Defined by the TIA/EIA 568-A specification. May be used with 10Base-T, 100Base-T4, and 100Base-T2.
Category 5 - Unshielded twisted pair with 100 ohm impedance and electrical characteristics supporting transmission at frequencies up to 100 MHz. Defined by the TIA/EIA 568-A specification. May be used with 10Base-T, 100Base-T4, 100Base-T2, and 100Base-TX. May support 1000Base-T, but cable should be tested to make sure it meets 100Base-T specifications.
Category 5e - Category 5e (or "Enhanced Cat 5") is a new standard that will specify transmission performance that exceeds Cat 5. Like Cat 5, it consists of unshielded twisted pair with 100 ohm impedance and electrical characteristics supporting transmission at frequencies up to 100 MHz. However, it has improved specifications for NEXT (Near End Cross Talk), PSELFEXT (Power Sum Equal Level Far End Cross Talk), and Attenuation. To be defined in an update to the TIA/EIA 568-A standard. Targetted for 1000Base-T, but also supports 10Base-T, 100Base-T4, 100Base-T2, and 100BaseTX.
Category 6 - Category 6 is a proposed standard that aims to support transmission at frequencies up to 250 MHz over 100 ohm twisted pair.
Category 7 - Category 7 is a proposed standard that aims to support transmission at frequencies up to 600 MHz over 100 ohm twisted pair.

Google Search

Google